|
Tuesday, April 4, 2017
Post Processing and Workflow Bootcamp - Lightroom and Photoshop - New Date 13-14 May 2017
HOME


Monday, April 3, 2017
Montana - Mountains, Plains, Yellowstone
14 Day MONTANA PHOTOGRAPHY TOUR 2017
MOUNTAINS, PLAINS and YELLOWSTONE with Mark Rayner and David MetcalfWhen : 16 - 29 August 2017
| Please join David Metcalf and Mark Rayner, as we venture into the wild open spaces in the Rocky Mountains exploring rivers, waterfalls, glaciers, abundant wildlife and the Native American culture at the annual Pow Wow in the Crow Reservation. |
Where : Montana, USA

Please note this amazing trip is limited to maximum 8 photographers.
13 Nights 14 DaysCommencing in Seattle this photo safari with Mark Rayner and David Metcalf will be an unforgettable experience for those interested in photographing some of the most beautiful landscape scenery in the world. Added to that the amazing annual Pow Wow will make this a trip of incredible memories and photographic opportunities.
Montana is as vast as the big sky that blankets its abundant natural resources – the forests, the plains and endless mountains that seem to reach beyond the heavens. Montana is an ancient landscape where the dinosaurs once roamed. On our travels, you will meet some of the most hospitable, friendly and welcoming people. The fascinating history of the old west unravels as we also visit some of the best museums in the country and photograph two of America’s most beautiful National Parks – Glacier and Yellowstone.
13 Nights 14 DaysCommencing in Seattle this photo safari with Mark Rayner and David Metcalf will be an unforgettable experience for those interested in photographing some of the most beautiful landscape scenery in the world. Added to that the amazing annual Pow Wow will make this a trip of incredible memories and photographic opportunities.
Montana is as vast as the big sky that blankets its abundant natural resources – the forests, the plains and endless mountains that seem to reach beyond the heavens. Montana is an ancient landscape where the dinosaurs once roamed. On our travels, you will meet some of the most hospitable, friendly and welcoming people. The fascinating history of the old west unravels as we also visit some of the best museums in the country and photograph two of America’s most beautiful National Parks – Glacier and Yellowstone.
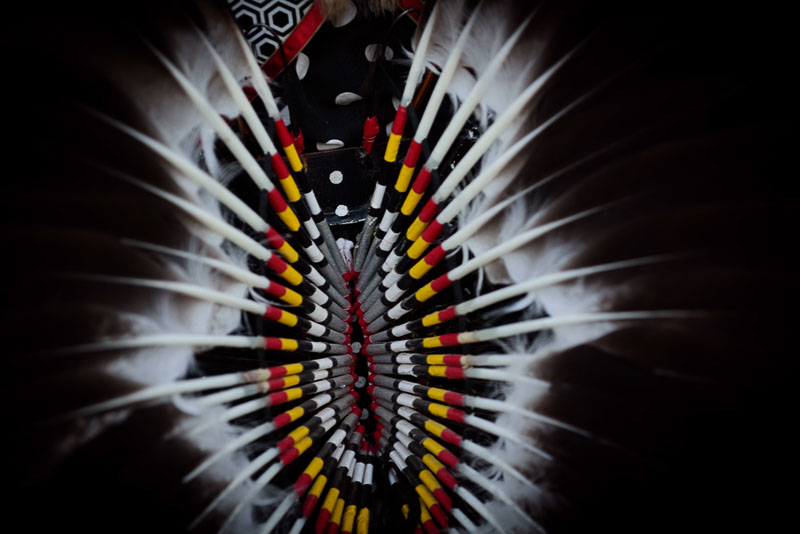
Beginning in Seattle, we will fly to Billings, Montana and experience the Crow Fair where thousands of indigenous dancers, musicians, rodeo riders and storytellers from different Native American tribes come together. During a 5-day festival they express and rejoice in their profound and wise culture. You will be surrounded by thousands of tepees, as the Crow people are proud to call their state, the tepee capital of the world. You will never forget this unique opportunity! To witness the colourful dancers dressed in beautiful regalia, to meet many friendly, tribal people, try their food and photograph in a very non-touristy setting is truly magical!
This is not a festival for tourism: It is a very genuine and sacred event to honour the native peoples of North America through dance, music, song and horsemanship. With incredible colours and vibrancy this festival starts early in the morning and goes well into the night. The beat of the Indian drums accompanies every dance. We spend the next two days photographing the Pow Wow and meeting the very kind and friendly Native American people. Our experienced Crow guide, Rose will be there to introduce us to Crow history and culture, including a visit to little Bighorn the sight of the killing of Custer. Rose was a park ranger at Custer’s Battlefield for years and now is devoting her time to bead making and independent guiding. We will meet her family and will pass the talking stick. “There will be plenty of opportunities to photograph the dancers, singers and participants of the Crow Fair ranging from the young dancers to the highly respected elders of the various invited Native American tribes.”
This is not a festival for tourism: It is a very genuine and sacred event to honour the native peoples of North America through dance, music, song and horsemanship. With incredible colours and vibrancy this festival starts early in the morning and goes well into the night. The beat of the Indian drums accompanies every dance. We spend the next two days photographing the Pow Wow and meeting the very kind and friendly Native American people. Our experienced Crow guide, Rose will be there to introduce us to Crow history and culture, including a visit to little Bighorn the sight of the killing of Custer. Rose was a park ranger at Custer’s Battlefield for years and now is devoting her time to bead making and independent guiding. We will meet her family and will pass the talking stick. “There will be plenty of opportunities to photograph the dancers, singers and participants of the Crow Fair ranging from the young dancers to the highly respected elders of the various invited Native American tribes.”
NEXT WE MOVE ON FOR SOME LANDSCAPE PHOTOGRAPHY
We will spend the next day relaxing in the Bighorn Canyon enjoying the sounds of silence. Bighorn is the second deepest canyon in the United States. Taking our time, we will be cruising through this stunning deep canyon with 1,000-foot cliffs towering above us and hopefully we will spot a few bald eagles.
Northern Wyoming and the classic western town of Cody will be one more stop before we arrive at another highlight - Yellowstone National Park. Here we will photograph massive waterfalls, striking geothermal features like Old Faithful and search for wildlife including bison, bears and wolves.

Yellowstone is rated as one of the most beautiful parks in America and we will spend many hours photographing there with plenty of flexibility in our schedule to stop “on demand” and cater for spontaneous moments.
HISTORY IS NEXT ON THE AGENDA!
We stay the night in an old historic beautifully restored hotel, and you will no doubt be charmed by the atmosphere and spend hours photographing through the old window sills and find inspiration in your photographic style. In both towns, Virginia City and Nevada City, we have plenty of time to wander and explore the old buildings photographing the architecture and history. If you want, you can even pan for gold and take a short train ride.
In the evening we will witness a show, a replica from 1864. The illustrious Virginia City Players perform
“Vaudeville” in the old City Opera House. Be ready for a lot of fun, loutish behaviour and hoedown good old-fashioned horsing around with characters who turn on the charm and take you back to the bygone era with good old-fashioned entertainment.
We will also visit Bannock, an abandoned mining town with a fascinating history. The houses have been left as they were in the 1860’s, untouched, so some great photo opportunities with a wide-angle lens present themselves here.
“Vaudeville” in the old City Opera House. Be ready for a lot of fun, loutish behaviour and hoedown good old-fashioned horsing around with characters who turn on the charm and take you back to the bygone era with good old-fashioned entertainment.
We will also visit Bannock, an abandoned mining town with a fascinating history. The houses have been left as they were in the 1860’s, untouched, so some great photo opportunities with a wide-angle lens present themselves here.
NORTH TO GLACIER NATIONAL PARK
Glacier National Park is known as the Crown of the Continent and claims to be the biggest intact ecosystem in the lower 48 states. The beauty of Glacier is rugged, raw and dynamic. We will drive the Going-to-the-Sun-Road, one of the most scenic drives in America. There are 25 glaciers in the Park and we will have the opportunity to photograph pristine waterfalls and crystalline lakes.
Within the 1600 square mile park, there is plenty of wildlife to site: Including grizzly bears, mountain goats, bighorn sheep and wolves.
We will be up before the sun to catch the early morning light casting its colours over the towering mountains and crystal clear lakes. Great Falls, Montana is our last night and the tour ends here.

Upcoming Workshops
Please give me a call or email to register your interest for the next
Montana - August 2017Alaska - September 2017
Fraser Island *
Madagascar / South Africa - June 2018
Tanzania - June 2018
Galapagos *
5 Day Rainforest Mountains Retreat *
Yosemite / Eastern Sierras *
USA Canyons *
Red Centre Adventure *
* Dates to be set
Call Mark on +61459221678
or EMAIL
Exposure Explained
HOME
Your camera has a built in light meter which is used to calculate the correct exposure for a given subject. But what if you need to adjust things for different circumstances. You might be shooting a landscape and wish to get everything in focus. You'll need to use a small aperture to allow for increased depth of field f/11, f/16 or f/22 may be required. How does this then affect the other settings.
What if you need a fast shutter speed to freeze a bird's wings in flight or minimize the effect of camera shake whilst hand holding a heavy lens? You may want to use 1/1000s or faster to achieve this. How does this then affect the other settings on your camera?
Apart from the available light, there are three things that combine to give you the correct exposure.
Adjusting one of these three settings has an impact on each of the others. In other words if the available light produces a perfect exposure with an aperture of f/8, a shutter speed of 1/200s and an ISO set at 800, a change in one of those three settings will necessitate a change in at least one of the other settings.
The diagram below demonstrates how this works. Notice that in the second group of settings the aperture has been reduced to f/11. Leaving the ISO at 800 means that the shutter speed has to be slowed down by 1 stop to 1/100s to maintain the correct exposure.
The final group of settings demonstrates a combined movement of aperture, shutter speed and ISO whilst maintaining the correct exposure. In this group we have reduced the aperture even more to f/16 to increase depth of field. We have decided to reduce the ISO to 400 to improve image quality (the lower, the better) which has required a reduction of the shutter speed by 2 stops down to 1/25s. It may seem complicated but it really isn't. If one thing goes up something else must go down by a corresponding amount.

To try and clear the situation up even further I have drawn up an Exposure Triangle which shows the effect one setting has on another.

You will notice that any two pieces of the triangle need to be adjusted in order to maintain the correct exposure.
Have a look at Aperture and Shutter for instance. Assuming the ISO is fixed, as the Aperture gets smaller (reducing the light transmitted to the sensor) the Shutter Speed needs to be slower (to allow more time for the light to reach the sensor). As you can see one balances the other.
Now take a look at moving ISO and Shutter Speed and keeping the Aperture fixed. If you need to use a faster Shutter Speed, to freeze action for example, you will need to increase the ISO to maintain the correct exposure.
Please feel free to save the Exposure Triangle image and print it off to keep with you as an easy reference tool.
You can set everything manually where you set both Aperture and Shutter Speed but to make things easier for you, your camera has two main semi-automatic modes for you to choose from:
Exposure Explained
One of the questions that I am asked about more often than I can remember is "How do I get my exposure right?"
Your camera has a built in light meter which is used to calculate the correct exposure for a given subject. But what if you need to adjust things for different circumstances. You might be shooting a landscape and wish to get everything in focus. You'll need to use a small aperture to allow for increased depth of field f/11, f/16 or f/22 may be required. How does this then affect the other settings.
What if you need a fast shutter speed to freeze a bird's wings in flight or minimize the effect of camera shake whilst hand holding a heavy lens? You may want to use 1/1000s or faster to achieve this. How does this then affect the other settings on your camera?
Apart from the available light, there are three things that combine to give you the correct exposure.
Aperture
Shutter Speed
ISO
Adjusting one of these three settings has an impact on each of the others. In other words if the available light produces a perfect exposure with an aperture of f/8, a shutter speed of 1/200s and an ISO set at 800, a change in one of those three settings will necessitate a change in at least one of the other settings.
The diagram below demonstrates how this works. Notice that in the second group of settings the aperture has been reduced to f/11. Leaving the ISO at 800 means that the shutter speed has to be slowed down by 1 stop to 1/100s to maintain the correct exposure.
The final group of settings demonstrates a combined movement of aperture, shutter speed and ISO whilst maintaining the correct exposure. In this group we have reduced the aperture even more to f/16 to increase depth of field. We have decided to reduce the ISO to 400 to improve image quality (the lower, the better) which has required a reduction of the shutter speed by 2 stops down to 1/25s. It may seem complicated but it really isn't. If one thing goes up something else must go down by a corresponding amount.

To try and clear the situation up even further I have drawn up an Exposure Triangle which shows the effect one setting has on another.

You will notice that any two pieces of the triangle need to be adjusted in order to maintain the correct exposure.
Have a look at Aperture and Shutter for instance. Assuming the ISO is fixed, as the Aperture gets smaller (reducing the light transmitted to the sensor) the Shutter Speed needs to be slower (to allow more time for the light to reach the sensor). As you can see one balances the other.
Now take a look at moving ISO and Shutter Speed and keeping the Aperture fixed. If you need to use a faster Shutter Speed, to freeze action for example, you will need to increase the ISO to maintain the correct exposure.
Please feel free to save the Exposure Triangle image and print it off to keep with you as an easy reference tool.
You can set everything manually where you set both Aperture and Shutter Speed but to make things easier for you, your camera has two main semi-automatic modes for you to choose from:
- Aperture Priority or Aperture Value - You set the Aperture and the camera automatically chooses the correct Shutter Speed based on the built in light meter reading.
- Shutter Priority or Time Value - You set the Shutter Speed and the camera automatically chooses the correct Aperture based on the built in light meter reading.
I don't want to get out of bed
HOME


Sunrise Photography
Okay, it's a cool autumn morning, the alarm has gone off and its still pitch black outside. That's right you remember you have a sunrise shoot planned but it would be oh so easy to just roll over and go back to sleep.
I'll be honest. I've done that a few times. But, on those times when I've dragged myself out of bed and headed for my planned sunrise spot, the rewards have been well worth the effort.
Pre-dawn, sunrise and early morning are wonderful times to be behind the lens. I particularly coastal foreshores for sunrise but wherever you are, once you're up, its greatly rewarding.

Camera settings are easy too. If you are near the ocean play with your shutter speed to get the water just right. Bracket you photos and think about blending later in post-processing to improve the dynamic range of your final image.

A reverse graduated filter can be handy too when you have a nice flat horizon. These filter have a clear lower half, a dark band in the middle fading to the top. The dark band is designed to run along the horizon as the sun rises, reducing the exposure to that area whilst the graduated section going upwards gradually allows more light to reach the sensor higher up the sky.

If you re a Sony shooter you've got some additional tools available in your App menu. You'll have to purchase and install first but the new Digital Filter is amazing. It allows you to emulate any Graduated Filter (including Reverse Grad) in camera and produces a final RAW image with the adjusted exposures blended perfectly. Give it a try. It's awesome!

Of course, if you don't have filters available you can always apply later in Lightroom or Camera Raw. The dynamic range available to us in modern digital cameras is such that adding a filter in post-processing won't result in any discernible loss of image quality.
So the bottom line.
Don't roll over :-)

Sunday, March 19, 2017
Planning Ahead
Please give me a call or email to register your interest for the next
Fraser Island
Madagascar / South Africa
Tanzania
Galapagos
5 Day Rainforest Mountains Retreat
Yosemite / Eastern Sierras
USA Canyons
Red Centre Adventure
Dates to be set
Call Mark on +61459221678
or EMAIL
10 Day Orangutans, Wildlife and Dayaks Photo Expedition - 16 - 25 May 2017
HOME


10 Day Orangutans, Wildlife and Dayaks Photo Expedition presented by Mark Rayner and David Metcalf
16 - 25 May 2017

Prehistoric tribes living in the forest, orangutans in the wild, exotic wildlife, giant hornbill birds or maybe wild Indiana Jones type headhunters roaming the impenetrable jungle rainforest?
Well its not quite like this these days, but if you long for an adventure into Central Borneo to photograph orangutans, large proboscis monkeys, unique birdlife and have the opportunity to meet the local traditional Dayak people whilst sailing along an ancient river in a house boat and going to sleep surrounded by pristine rainforests, then this is the trip for you.

Mark Rayner and Dayak Dave Metcalf will be leading this fascinating and unique photography adventure to bring you in touch with amazing orang-utans and Dayak culture.
Borneo (in Indonesia, known as Kalimantan), the Amazon of Asia, has a rich array of birdlife and wonderful primates including orangutans, which we get to see at close quarters.
This is simply an unforgettable experience and one that will remain with you forever.

For all the details and booking information click - > HERE
Post Processing and Workflow Bootcamp - Lightroom and Photoshop NEW DATE -13-14 May 2017
HOME
|
Sunshine Coast Weekend of Photography 8th and 9th July 2017
HOME
Hi Everyone,
I've just released new dates for the Mountain to Beach Experience and the Australia Zoo Experience, both on the Sunshine Coast, for 8 and 9 July 2017.


I'm also continuing the new combo-offer whereby you can attend both workshops on the same weekend for the same cost as a normal weekend workshop.
That's a significant saving of $129.80 over both workshops.
Where: Buderim - Tanawha - Point Cartwright
Next workshop: Saturday 8 July 2017
During this workshop we will cover a number of photography genres. You'll learn how to achieve the feeling of movement when shooting waterfalls and seascapes.
We'll take a look at the techniques for shooting the hidden world of macro photography and you'll be introduced to the wonderful world of birds.
It's a big day commencing at Buderim Rainforest Park and finishing at sunset on the foreshore of Point Cartwright. For full details click the link below.
Full details

Where: Beerwah
Next Workshop: Sunday 9 July 2017
Today is all about wildlife photography.
You'll learn the best focusing techniques, composition, exposure methods and much, much more to help you achieve a greater success rate when shooting wildlife.
Planning a trip to Africa? This is great way to prepare for your amazing adventure.
For all the details click the link below.
Full details

Sunshine Coast Weekend of Photography
8th and 9th July 2017
Hi Everyone,
I've just released new dates for the Mountain to Beach Experience and the Australia Zoo Experience, both on the Sunshine Coast, for 8 and 9 July 2017.


I'm also continuing the new combo-offer whereby you can attend both workshops on the same weekend for the same cost as a normal weekend workshop.
That's a significant saving of $129.80 over both workshops.
Saturday - Full day Mountains to Beach Experience Photography Workshop
Where: Buderim - Tanawha - Point Cartwright
Next workshop: Saturday 8 July 2017
During this workshop we will cover a number of photography genres. You'll learn how to achieve the feeling of movement when shooting waterfalls and seascapes.
We'll take a look at the techniques for shooting the hidden world of macro photography and you'll be introduced to the wonderful world of birds.
It's a big day commencing at Buderim Rainforest Park and finishing at sunset on the foreshore of Point Cartwright. For full details click the link below.
Full details

Sunday - Full Day Australia Zoo* Wildlife Photography Workshop
Where: Beerwah
Next Workshop: Sunday 9 July 2017
Today is all about wildlife photography.
You'll learn the best focusing techniques, composition, exposure methods and much, much more to help you achieve a greater success rate when shooting wildlife.
Planning a trip to Africa? This is great way to prepare for your amazing adventure.
For all the details click the link below.
Full details

Attend both workshops on the same weekend and only pay the normal weekend workshop rate.
The combined cost of doing both workshops is reduced to $473.00, a saving of $129.80 over the regular price.
Click -> HERE for details
* Does not include Australia Zoo entry fee.
The combined cost of doing both workshops is reduced to $473.00, a saving of $129.80 over the regular price.
Click -> HERE for details
* Does not include Australia Zoo entry fee.
Saturday, February 11, 2017
Quick Tip - Simplify file selections at import.
Quick Tip - Simplify file selections at import.
Visit: Trekabout
Often when we are travelling we have limited space and weight restrictions. I always travel with a laptop but sometimes I may leave the external hard drives at home and rely on my SD and Compact Flash memory cards for image safety until I return home. Having conducted many, many photography workshops and tours I can safely say that there are a lot of people doing the same thing.
One of the issues that arises from this practice though is having multiple shoots on the memory card. My normal practice when at home or carrying an external drive is to upload my images to my laptop via Adobe Lightroom, backing up to the external drive. I can then safely format my memory card ready for the next shoot.
Now back to having multiple shoots on the same memory card. By the way, it may not always be when traveling. You might shoot a sunrise at the beach in the morning and then go off to the rainforest for a fungi macro shoot and then photograph some birds later that afternoon. Three very different shoots on the same day. Completely different naming and keyword requirements.
Those of you who have been on one of my extended tours or attended my two day post processing boot camps wil recall that my preference for file naming includes a description of the shoot (added by way of a Lightroom preset including custom text when the images are imported). I'm sure you can see the problem. Three shoots require three three different names and a variety of different keywords.
So what's the solution. Whilst in the import dialogue it is possible to deselect all the images and then make a selection of the images you wish to import. You left-click on the first image, find the last image, hold down the shift key and left-click that image. All the images between the first and the last will now be highlighted. You then just need to left-click in one of the little boxes on the top left hand side of the thumbnail and all the little boxes will receive a tick. Everything with a tick will be imported and renamed as per your 'Custom Text'. You can also add any number of relevant keywords which will also be added during import.
After the import is complete, it's just a matter of repeating the process for each separate shoot. That's where things can get a little tricky. You may have have hundreds of images to select and quite often finding where one shoot finishes and the next one starts can be a little difficult. Yes, if you have 'Don't import suspected duplicates' ticked in the import dialogue then those images should be greyed out so finding the first image is easy. It's getting to that last one that can be time consuming.
So, here is the tip. During the course of the day’s photography and after each shoot is complete simply fire off a burst of shots with your lens cap on. Five to ten shots will be plenty. Now when you are scrolling down through all your image thumbnails looking for that elusive last image you'll suddenly be confronted with a block of black exposures. You'll know instantly that that's the end of that shoot. Obviously, ignore the black shots and don't import them. Repeat the process for the next group and so on.

The process of making all those selections will have just gotten a whole lot easier.
Friday, January 20, 2017
Exposure Explained
HOME
One of the questions that I am asked about more often than I can remember is "How do I get my exposure right?"
Your camera has a built in light meter which is used to calculate the correct exposure for a given subject. But what if you need to adjust things for different circumstances. You might be shooting a landscape and wish to get everything in focus. You'll need to use a small aperture to allow for increased depth of field f/11, f/16 or f/22 may be required. How does this then affect the other settings.
What if you need a fast shutter speed to freeze a bird's wings in flight or minimize the effect of camera shake whilst hand holding a heavy lens? You may want to use 1/1000s or faster to achieve this. How does this then affect the other settings on your camera?
Apart from the available light, there are three things that combine to give you the correct exposure.
Adjusting one of these three settings has an impact on each of the others. In other words if the available light produces a perfect exposure with an aperture of f/8, a shutter speed of 1/200s and an ISO set at 800, a change in one of those three settings will necessitate a change in at least one of the other settings.
The diagram below demonstrates how this works. Notice that in the second group of settings the aperture has been reduced to f/11. Leaving the ISO at 800 means that the shutter speed has to be slowed down by 1 stop to 1/100s to maintain the correct exposure.
The final group of settings demonstrates a combined movement of aperture, shutter speed and ISO whilst maintaining the correct exposure. In this group we have reduced the aperture even more to f/16 to increase depth of field. We have decided to reduce the ISO to 400 to improve image quality (the lower, the better) which has required a reduction of the shutter speed by 2 stops down to 1/25s. It may seem complicated but it really isn't. If one thing goes up something else must go down by a corresponding amount.
To try and clear the situation up even further I have drawn up an Exposure Triangle which shows the effect one setting has on another.
You will notice that any two pieces of the triangle need to be adjusted in order to maintain the correct exposure.
Have a look at Aperture and Shutter for instance. Assuming the ISO is fixed, as the Aperture gets smaller (reducing the light transmitted to the sensor) the Shutter Speed needs to be slower (to allow more time for the light to reach the sensor). As you can see one balances the other.
Now take a look at moving ISO and Shutter Speed and keeping the Aperture fixed. If you need to use a faster Shutter Speed, to freeze action for example, you will need to increase the ISO to maintain the correct exposure.
Please feel free to save the Exposure Triangle image and print it off to keep with you as an easy reference tool.
You can set everything manually where you set both Aperture and Shutter Speed but to make things easier for you, your camera has two main semi-automatic modes for you to choose from:
Exposure Explained
Your camera has a built in light meter which is used to calculate the correct exposure for a given subject. But what if you need to adjust things for different circumstances. You might be shooting a landscape and wish to get everything in focus. You'll need to use a small aperture to allow for increased depth of field f/11, f/16 or f/22 may be required. How does this then affect the other settings.
What if you need a fast shutter speed to freeze a bird's wings in flight or minimize the effect of camera shake whilst hand holding a heavy lens? You may want to use 1/1000s or faster to achieve this. How does this then affect the other settings on your camera?
Apart from the available light, there are three things that combine to give you the correct exposure.
Aperture
Shutter Speed
ISO
Adjusting one of these three settings has an impact on each of the others. In other words if the available light produces a perfect exposure with an aperture of f/8, a shutter speed of 1/200s and an ISO set at 800, a change in one of those three settings will necessitate a change in at least one of the other settings.
The diagram below demonstrates how this works. Notice that in the second group of settings the aperture has been reduced to f/11. Leaving the ISO at 800 means that the shutter speed has to be slowed down by 1 stop to 1/100s to maintain the correct exposure.
The final group of settings demonstrates a combined movement of aperture, shutter speed and ISO whilst maintaining the correct exposure. In this group we have reduced the aperture even more to f/16 to increase depth of field. We have decided to reduce the ISO to 400 to improve image quality (the lower, the better) which has required a reduction of the shutter speed by 2 stops down to 1/25s. It may seem complicated but it really isn't. If one thing goes up something else must go down by a corresponding amount.
To try and clear the situation up even further I have drawn up an Exposure Triangle which shows the effect one setting has on another.
You will notice that any two pieces of the triangle need to be adjusted in order to maintain the correct exposure.
Have a look at Aperture and Shutter for instance. Assuming the ISO is fixed, as the Aperture gets smaller (reducing the light transmitted to the sensor) the Shutter Speed needs to be slower (to allow more time for the light to reach the sensor). As you can see one balances the other.
Now take a look at moving ISO and Shutter Speed and keeping the Aperture fixed. If you need to use a faster Shutter Speed, to freeze action for example, you will need to increase the ISO to maintain the correct exposure.
Please feel free to save the Exposure Triangle image and print it off to keep with you as an easy reference tool.
You can set everything manually where you set both Aperture and Shutter Speed but to make things easier for you, your camera has two main semi-automatic modes for you to choose from:
- Aperture Priority or Aperture Value - You set the Aperture and the camera automatically chooses the correct Shutter Speed based on the built in light meter reading.
- Shutter Priority or Time Value - You set the Shutter Speed and the camera automatically chooses the correct Aperture based on the built in light meter reading.
Subscribe to:
Posts (Atom)